We have written this guidance called “Mail Merge Help & Examples” to help you get started. RightSend Mail Merge for Gmail sends a personalized email to every person on your list — and, if you’re on the Pro plan, a different attachment to each one too. This page walks through every step, from connecting your first spreadsheet to sending your first real batch.
If you’re the kind of person who reads invoices, certificates, or event tickets by the hundred, this guide is for you. Pixel the Cat approves. 🐾
Connect Your Recipient List with Mail Merge
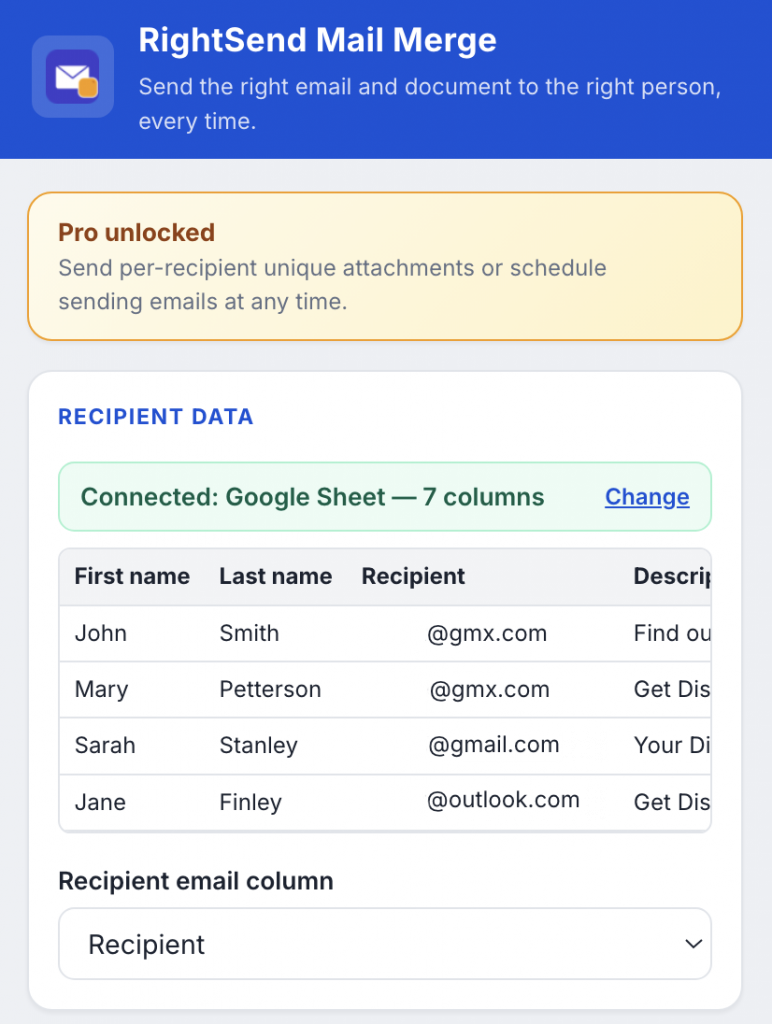
Mail Merge needs one place to pull recipient details from: a Google Sheet or a local Excel/CSV file. Both work the same way once connected, so pick whichever is easier for you.
Google Sheet — paste the sheet’s link into the popup and click “Connect Google Sheet.” You’ll see a quick permissions prompt the first time; it only ever reads the one sheet you connect, nothing else in your Drive.
Excel or CSV file — click “Load an Excel or CSV file” and pick it from your computer. This path needs no Google sign-in at all, since the file never leaves your device.
Either way, your sheet needs one header row, one row per recipient, and a column with each person’s email address. Once connected, choose that column under “Recipient email column” so Mail Merge knows where to send.
Write a Personalized Subject and Message
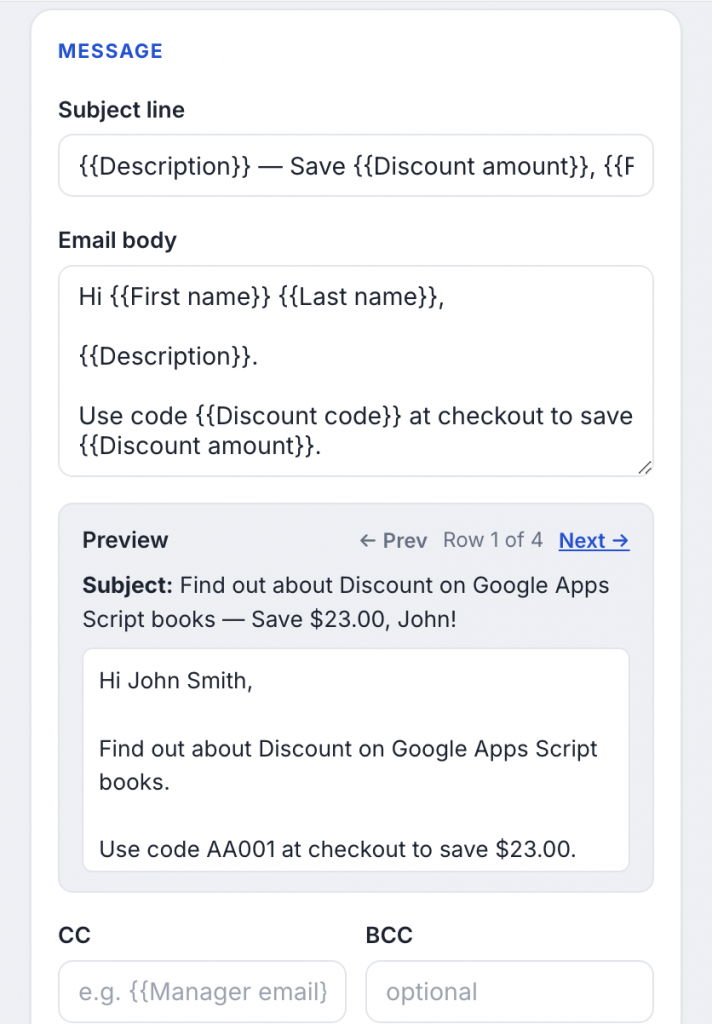
Next, write your subject line and email body once. Anywhere you want a personal touch — a name, a discount code, a due date — drop in a placeholder using the column name from your sheet, wrapped in double curly braces: {{First name}}.
For example, if your sheet has a column called “Discount code,” typing {{Discount code}} in your message pulls in that row’s value automatically.
So a body like this:
Hi {{First name}},
Use code {{Discount code}} to save {{Discount amount}} at checkout.
turns into a genuinely personal email for every single recipient, without you copying and pasting a single value by hand.
Before sending anything, check the Preview panel. It shows exactly what row 1’s email will look like once merged, and you can click through every other row too. That way, a typo in a placeholder — say {{FirstName}} instead of {{First name}} — gets caught before it goes out looking wrong to a real person.
Send a Different Attachment to Each Recipient (Pro) in Mail Merge
Here’s the feature that makes Mail Merge different from a plain mail-merge tool: sending a different attachment to each recipient, automatically named from your data. It’s built for exactly the documents that vary person-by-person — invoices, certificates, payslips, and event tickets.
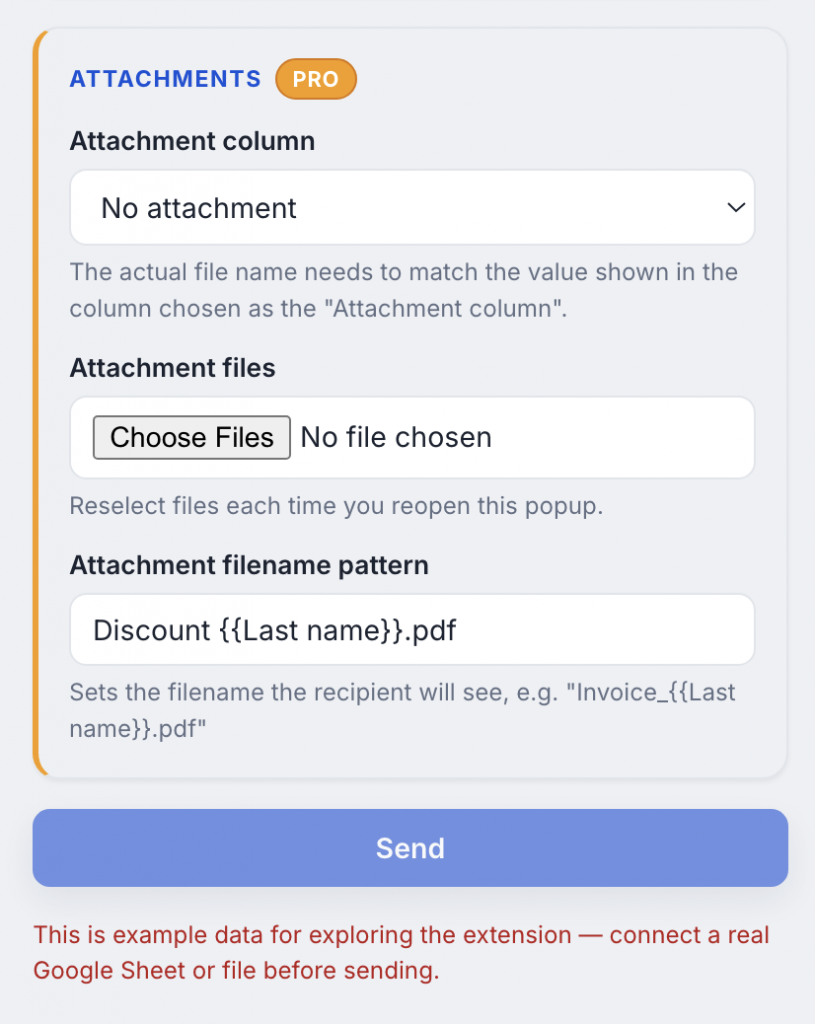
Setting it up takes three steps:
1. Pick an Attachment column — the column whose value identifies which file belongs to that row. A “Discount code” column holding “AA001”, “AA002”, and so on works well.
2. Select your files from your computer. Mail Merge matches each row by looking for a file whose name contains that row’s value — so a row with “AA001” picks up “AA001.pdf” automatically. If a file is missing or more than one matches, that row is skipped with a clear reason instead of guessing.
3. Set a filename pattern to auto-name attachments the way your recipient will actually see them, e.g., Invoice_{{Last name}}.pdf. This only changes the display name — it doesn’t affect which file gets matched, so you’re free to make it friendly and readable.
One thing worth knowing up front: because of how Chrome handles file pickers, your selected files don’t stay chosen if you close the popup.
That’s a browser limitation, not a bug — just reselect them before your next send.
Schedule Sends for Later (Pro)
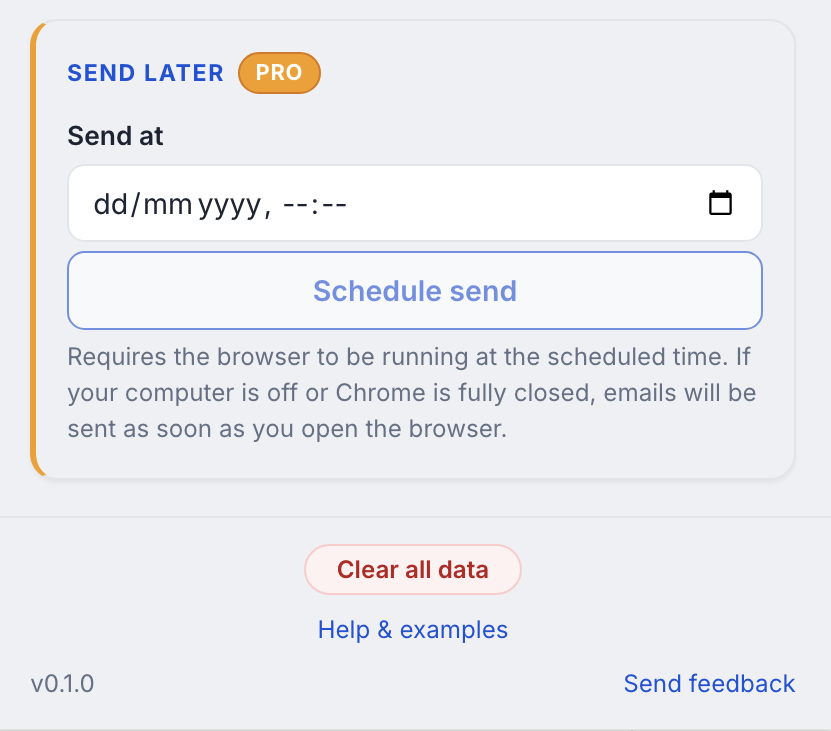
Need a batch to go out at 9 a.m. tomorrow instead of right now? Pro also unlocks scheduled sending. Pick a date and time under “Send later,” click “Schedule send,” and Mail Merge takes it from there.
A quick, honest caveat: scheduling needs your browser to actually be running at the scheduled time, since there’s no separate server sending on your behalf. If your computer is off or Chrome is fully closed, your batch sends as soon as you open the browser again instead of being lost.
Keep Your Gmail Account Safe
Every plan — free or Pro — includes safe-send pacing by default. Mail Merge spaces emails out a few seconds apart (about a minute apart for scheduled batches), well under Gmail’s own limits.
This isn’t a restriction to work around. Accounts have been flagged for spam even below Gmail’s official limits when sending looks bursty or templated, so this pacing exists purely to protect your account’s long-term health.
Review Your Results
Once a batch finishes — immediate or scheduled — Mail Merge shows a summary of what happened: how many sent, how many failed, and a specific reason for every failure (a missing email address, an invalid format, and so on), instead of one vague error for the whole batch.
A “.xlsx” copy of those results also saves automatically to your Downloads/Mail Merge Results folder, so you always have a record, even if you forget to click anything.
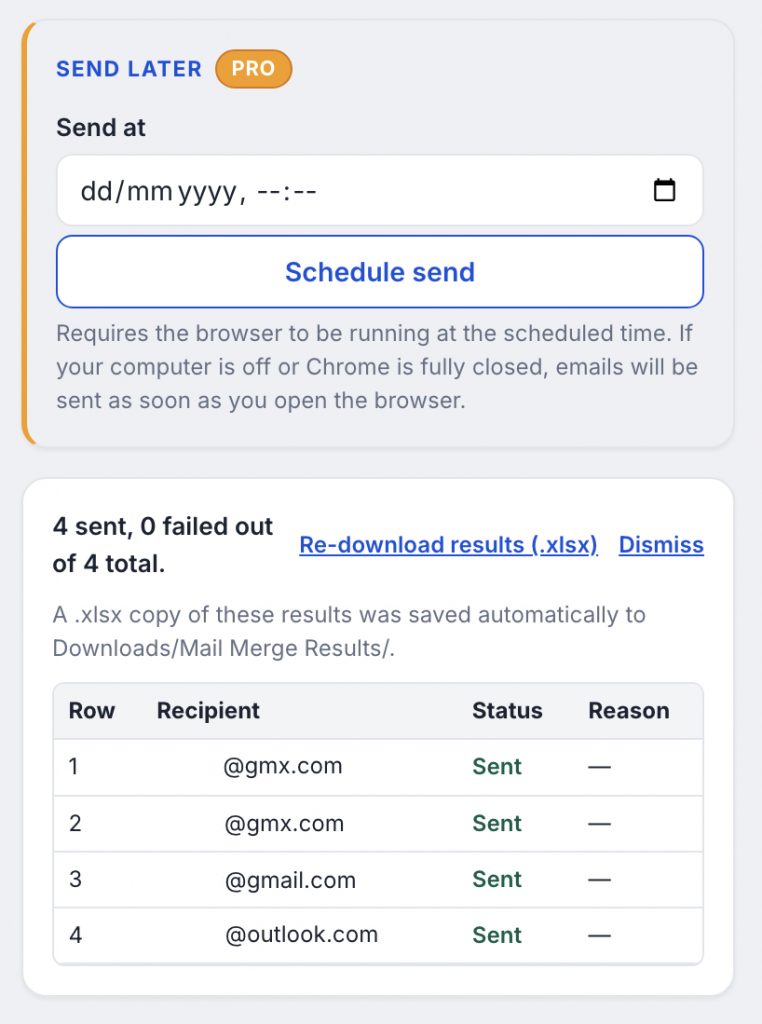
failed out of 4 total,” a download link, and a results table with
recipients across different email providers.
Frequently Asked Questions
Do my recipients need a Gmail account too?
No. Only the account sending the mail merge needs to be Gmail or Google Workspace. Recipients can use Outlook, Yahoo, or any other provider — the message arrives the same way any normal email would.
Why do emails send one at a time instead of all at once?
Because every recipient gets genuinely different content, each one is a separate email under the hood. Sending them all in one instant burst is also exactly the pattern that gets accounts flagged for spam, so Mail Merge paces them out deliberately to protect you.
Does this work with Outlook or a corporate email address?
Not yet. Mail Merge currently supports Gmail and Google Workspace only.
That said, a company email address hosted on Google Workspace works exactly like a personal Gmail account.
What happens if I close the popup mid-send?
An immediate send in progress will stop if you close the popup, so keep it open until the batch finishes. A scheduled send is different: it runs in the background, so it keeps going even after you close the popup.
Is my data private?
Yes. Mail Merge runs entirely on your device — no server ever sees your recipient list, your email content, or your attachments. That’s true whether you’re on the free plan or Pro.
Ready to Try It?
Install RightSend Mail Merge from the Chrome Web Store, connect a spreadsheet, and send your first personalized batch in a few minutes. Upgrading to Pro unlocks per-recipient attachments and scheduled sending whenever you’re ready for them.
Still stuck on something? Reach out through our Contact and FAQ page — Pixel and the team read every message.
Try out our other extensions in Chrome Web Store.